

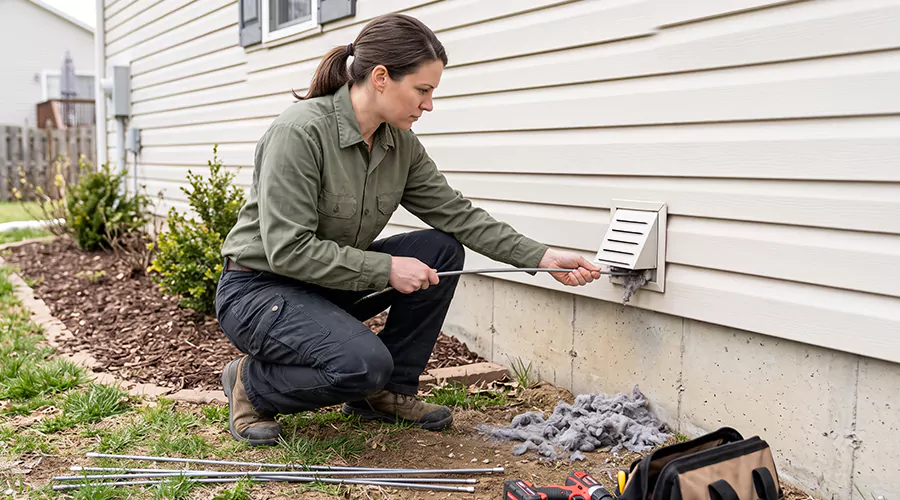
To clean a dryer exhaust vent, disconnect the dryer from electrical power, remove lint from the accessible exhaust duct, and check that the outdoor termination is clear. A dryer-rated brush and vacuum can remove accumulated fibers from suitable metal ductwork. Professional dryer vent cleaning service can help remove stubborn lint from longer or hard-to-reach exhaust passages. The entire exhaust passage must remain connected and unobstructed before the appliance is used again.
A dryer exhaust vent carries warm, moisture-laden air from the appliance to the outdoors. During each drying cycle, loose fibers separate from clothing and become suspended in the moving air. Although the dryer's lint screen captures much of this material, some particles continue through the exhaust passage and settle inside the duct.
Lint accumulation can gradually restrict airflow, making clothes take longer to dry. A severely clogged exhaust can also contribute to overheating and fire hazards because lint is combustible. Regular cleaning helps maintain normal drying performance and reduces the risks associated with accumulated fibers.
The correct cleaning process depends on the length and layout of the exhaust. A short metal duct leading directly through an exterior wall is easier to maintain than a long passage containing several elbows. Understanding the complete exhaust system helps prevent the mistake of cleaning only one opening while leaving a blockage farther inside.
What Is a Dryer Exhaust Vent?
A dryer exhaust vent is the duct system that carries hot, moist air from a conventional vented clothes dryer to an outdoor termination. It commonly includes a short transition duct behind the appliance and a permanent metal duct passing through the building. At the exterior end, a hood or damper allows exhaust to leave while helping limit unwanted air and water entry.
The exhaust vent is separate from the heating and cooling ductwork used to circulate indoor air. Dryer exhaust carries moisture and lint, so it has specific construction and installation requirements. A material approved for an HVAC supply duct is not automatically suitable for dryer venting.
Most conventional residential dryer exhaust ducts use smooth metal pipe with a nominal diameter of four inches. The actual installation must follow the dryer manufacturer's instructions and applicable local code. Listed condensing or heat-pump dryers without exterior exhaust use a different moisture-removal arrangement and should be maintained according to their own instructions.
Main Components of a Dryer Exhaust System
The exhaust path includes several components that may collect lint or develop restrictions. Identifying them helps determine which areas need cleaning and which parts should be inspected for damage.
| Dryer Exhaust Component | Main Function | Common Maintenance Concern |
|---|---|---|
| Lint screen | Captures loose fibers before exhaust | Filter becomes covered or damaged |
| Lint filter housing | Supports screen and directs airflow | Loose lint collects near the opening |
| Dryer exhaust outlet | Connects appliance to duct | Debris accumulates near discharge |
| Transition duct | Connects dryer to permanent exhaust | Crushing or lint buildup |
| Permanent metal duct | Carries exhaust through building | Deposits at bends and joints |
| Exterior termination | Releases exhaust outdoors | Lint or debris restricts damper |
The components should work together as one continuous exhaust path. Cleaning the filter alone does not remove deposits inside the duct. Likewise, clearing the outdoor flap may leave a restriction near the appliance or in a concealed elbow.
Why Does a Dryer Exhaust Vent Need Cleaning?
Dryer exhaust vents accumulate lint because clothing naturally sheds fibers during tumbling. Fine particles can pass through a clean lint filter and enter the exhaust duct. As material collects along the passage, the available area for airflow may become smaller.
An unobstructed exhaust allows the dryer to remove moisture from clothing effectively. When airflow becomes restricted, damp air may remain in the drum longer than expected. The appliance may require additional operating time, which can increase energy use.
A blocked exhaust can also contribute to overheating. The U.S. Fire Administration identifies failure to clean as a leading contributing factor in residential clothes dryer fires. Removing lint is therefore an important maintenance task rather than simply a way to improve drying speed.
Regular cleaning does not correct every dryer problem. A malfunctioning heating component or damaged blower may produce similar symptoms. However, checking the exhaust is an appropriate first step when normal loads begin taking significantly longer to dry.
What Are the Signs of a Clogged Dryer Exhaust Vent?
A clogged dryer exhaust vent often causes a noticeable change in drying performance. The symptoms may develop slowly as lint accumulates, making it easy to assume that the dryer is simply getting older. However, unusual heat or odors should be treated as warning signs rather than normal wear.
Longer Drying Times
Clothes may remain damp after a cycle that previously dried similar loads completely. The dryer must remove water vapor from the drum to finish the drying process. Restricted exhaust airflow makes this less effective.
An overloaded dryer can also produce long drying times, so compare ordinary loads under similar conditions. If the problem occurs consistently, the exhaust duct should be checked. Repeating cycles without investigating a possible restriction can increase operating time without correcting the cause.
Unusually Hot Dryer Cabinet
The dryer exterior may feel warmer than expected when ventilation is restricted. Some appliances have safety controls that stop operation when internal temperatures become excessive. Repeated shutdowns require attention because the cause may involve the exhaust or another appliance component.
A dryer that overheats should not be used repeatedly as a troubleshooting experiment. Stop operation and identify the problem before restarting. A qualified appliance technician may be needed when the symptom continues after the exhaust has been cleared.
Weak Exhaust at the Outdoor Opening
The outdoor termination should release air when the dryer is operating normally. Weak discharge or a damper that fails to open can indicate a blockage. However, the observation does not establish whether the restriction is near the dryer or farther along the duct.
A damaged transition hose can also reduce exhaust airflow. The entire path needs consideration rather than assuming the exterior hood is the only problem.
Additional Warning Signs
Other symptoms that deserve inspection include:
- Laundry requires two cycles instead of one.
- Clothes feel unusually hot after drying.
- Warm, humid air builds up in the laundry room.
- A burning odor appears during appliance operation.
- The dryer stops unexpectedly.
- Heavy lint is visible near the exterior hood.
- The transition duct is kinked or crushed.
- The outdoor damper does not move normally.
- Lint deposits are visible around accessible connections.
- Drying performance remains poor despite a clean lint screen.
If smoke or fire is present, evacuate and contact emergency services. A burning smell or serious overheating condition also requires stopping dryer use until the cause is addressed. These symptoms should not wait for an ordinary annual cleaning appointment.
What Tools Do You Need to Clean a Dryer Exhaust Vent?
Cleaning an accessible dryer exhaust generally requires a brush suitable for the duct and a vacuum that can collect loose lint. Extension rods may be useful for longer passages when the tool is compatible with the installation. The equipment should remove deposits without tearing the duct or separating concealed joints.
Common supplies include:
- Dryer vent cleaning brush kit
- Vacuum with hose and crevice attachment
- Flashlight
- Work gloves
- Screwdriver or suitable clamp tool
- Cleaning cloth
- Container for collected lint
- Replacement approved clamp when necessary
- Dryer manufacturer's maintenance instructions
A rigid metal duct can usually tolerate a different cleaning method from a thin transition hose. Avoid using a large stiff brush in fragile or damaged material. The manufacturer's instructions should determine which tools are suitable for the exhaust system.
For an unusually long vent, a professional may use specialized equipment to reach and collect deposits. Household extension rods can become disconnected or stuck when forced through several bends. More force is not a substitute for a tool designed for the duct's configuration.
How to Clean a Dryer Exhaust Vent Step by Step?
A thorough cleaning addresses the accessible exhaust components and verifies that air can discharge outdoors. The process should begin with the appliance safely disconnected from power. The correct sequence reduces the chance of damaging the exhaust connection or leaving lint inside the passage.
Step 1. Turn Off and Unplug the Dryer
Switch off the appliance and allow it to cool. Disconnect the dryer from electrical power before removing the exhaust connection or inserting cleaning tools. This prevents accidental operation while parts of the ventilation system are open.
For a gas dryer, pay attention to the fuel connection before moving the appliance. Do not stretch or disconnect the gas line simply to create access. If the exhaust connection cannot be reached without disturbing gas piping, arrange qualified service.
Step 2. Remove Lint From the Filter
Pull out the lint screen and remove accumulated fibers. Inspect the mesh for residue or visible damage. Some dryer manufacturers recommend washing the screen when detergent or fabric softener deposits affect airflow through the material.
If washing is appropriate, follow the appliance instructions and let the screen dry completely before reinstalling it. A damaged filter should be replaced with a compatible part. Never operate the dryer without its required lint screen.
Step 3. Clean the Accessible Filter Housing
Use a suitable lint brush or vacuum crevice attachment to collect fibers from the accessible filter opening. Lint can remain in nearby recesses even when the removable screen looks clean. The tool should be inserted gently without damaging internal components.
Do not open sealed appliance panels as part of ordinary vent cleaning. Internal dryer maintenance may require model-specific procedures and a qualified technician. The household cleaning task should remain limited to accessible areas described in the manufacturer's instructions.
Step 4. Inspect the Transition Duct
Locate the connection between the dryer outlet and the permanent exhaust pipe. The transition duct should be an approved material and should not be crushed behind the appliance. Check for visible bends or openings where lint may escape.
If the duct is safely accessible and can be disconnected without disturbing gas or electrical connections, examine its condition before cleaning. A severely crushed or torn transition duct generally needs replacement. Cleaning alone cannot restore material that no longer maintains an adequate exhaust passage.
Step 5. Disconnect the Accessible Exhaust Connection
For an appropriate installation, loosen the clamp or approved attachment securing the transition duct to the permanent exhaust. Support the duct while removing it to avoid tearing or deforming the material. Take a photograph of the connection before disassembly if its arrangement is unfamiliar.
Avoid pulling on a flexible hose to release a tight fitting. This can damage the transition duct or loosen the wall connection. A connection that cannot be separated safely should be left for appropriate service rather than forced apart.
Step 6. Vacuum Loose Lint From the Duct Entrance
Use a vacuum hose to collect accessible lint from the exposed duct opening. Remove large loose deposits carefully instead of pushing them farther inside. The objective is to collect fibers before more detailed brushing begins.
Inspect the entrance with a flashlight for damaged metal or signs of an obstruction. If nesting material or another unusual blockage is visible, determine whether specialized removal is necessary. Ordinary lint cleaning should not disturb active wildlife or unknown contaminated debris.
Step 7. Brush the Permanent Exhaust Duct
Insert a suitable dryer vent cleaning brush into a compatible metal exhaust passage. Follow the tool instructions for movement and any approved rotation direction. Work gradually so lint can be loosened without damaging the duct or causing sections of the tool to detach.
A long or sharply bent passage may be difficult to clean from one opening. Do not force the brush when resistance suggests a major obstruction or unsuitable bend. A stuck cleaning rod can create a new blockage that requires more extensive removal work.
Collect the loosened debris using suitable vacuum equipment. The goal is to remove the material from the exhaust rather than push it into a different section. A duct with concealed damage may require professional inspection before additional cleaning continues.
Step 8. Clean the Accessible Transition Duct
Inspect the detached transition section and remove loose lint with a compatible brush or vacuum. Work carefully because some transition materials are easier to deform than rigid pipe. A damaged metal connector should be replaced instead of repeatedly bent back into shape.
Do not substitute a plastic or unsuitable foil-style accordion hose for an approved metal transition duct. The replacement should follow the dryer manufacturer's instructions and maintain an appropriate connection length.
Step 9. Check the Exterior Exhaust Hood
Locate the exterior termination and check whether lint has accumulated around the outlet. With the dryer switched off, remove debris that can be reached safely without damaging the damper. A wall termination accessible from ground level is generally easier to clean than a roof outlet.
Do not install mesh screening over the opening because it can trap exiting lint. The termination should allow exhaust to leave while limiting unwanted outdoor entry. If a roof outlet needs cleaning, use a qualified professional rather than attempting unsafe roof access.
Step 10. Reconnect the Exhaust Properly
Reattach the transition duct using approved fittings. The joint should remain secure without protruding screws or other obstructions that could collect lint inside the passage. The duct must not be crushed when the dryer is returned to its normal position.
Check the transition arrangement before restoring power. Sharp bends and excessive compression can create another restriction immediately after cleaning. A short, appropriately routed connection helps maintain normal exhaust airflow.
Step 11. Check Dryer Operation
Once the exhaust is completely connected and the appliance is safe to operate, restore power. Run a suitable test cycle according to the dryer manufacturer's instructions. Observe the exterior discharge from a safe location and confirm that the damper opens normally.
The dryer should operate without unusual odors or overheating symptoms. If airflow remains weak or drying problems continue, stop using the appliance until the cause is identified. A remaining obstruction or appliance malfunction may require professional evaluation.
Step 12. Record the Maintenance Date
Document the date of cleaning and any damaged components that were replaced. This record helps determine when the next service is due and whether the vent develops recurring restrictions. Note any unusual lint accumulation or difficulty reaching parts of the duct.
If the same blockage returns unusually quickly, the exhaust design may need inspection. Long runs or excessive bends can contribute to repeated buildup. The maintenance record provides useful information when evaluating whether the duct needs correction.
How Do You Clean Different Dryer Exhaust Materials?
The duct material affects which cleaning methods can be used without causing damage. Smooth rigid metal is commonly used for permanent dryer exhaust ducts because it provides a suitable passage for warm, lint-containing air. Transition ducts have different requirements and may be more vulnerable to deformation.
| Exhaust Material | Cleaning Consideration | Recommended Approach |
|---|---|---|
| Smooth rigid metal duct | Suitable for compatible brushing | Brush and collect lint |
| Semi-rigid metal transition | Can deform under pressure | Gentle cleaning or replacement if damaged |
| Listed flexible metal transition | Must remain approved and undamaged | Follow manufacturer instructions |
| Plastic exhaust hose | Unsuitable for conventional dryer exhaust | Replace with approved material |
| Thin foil-style accordion hose | May trap lint or become crushed | Evaluate replacement with approved metal product |
| Severely corroded metal duct | May be structurally weakened | Repair or replace rather than brush aggressively |
The type and condition of a flexible metal transition duct should be checked against its listing and the dryer manufacturer's requirements. A product approved for one installation may not be suitable for another. Using an inappropriate cleaner on a fragile connection can make a minor lint problem worse.
A damaged permanent duct should not simply be covered with HVAC cloth tape. Dryer exhaust installations have specific requirements intended to limit lint collection and maintain proper airflow. A repair should preserve a smooth, unobstructed passage.
What Is the Difference Between Dryer Exhaust Cleaning and HVAC Duct Cleaning?
Dryer exhaust cleaning removes lint from the passage carrying hot, moisture-laden air outdoors. HVAC duct cleaning addresses deposits in the heating and cooling system that circulates air through occupied rooms. Although both systems contain ducts, they serve different purposes and have different maintenance concerns.
A dryer exhaust typically has a smaller passage than most HVAC supply or return ducts. It also carries combustible lint, making proper cleaning and material selection especially important. The exhaust should remain independent of the home's heating and cooling ventilation system.
| Feature | Dryer Exhaust Vent | HVAC Air Duct |
|---|---|---|
| Main purpose | Removes dryer moisture and exhaust air | Distributes conditioned indoor air |
| Common deposit | Clothing lint | Household dust and particles |
| Discharge location | Outdoors | Supply and return system within building |
| Main cleaning concern | Lint restriction and fire risk | Deposits and documented contamination |
| Typical maintenance | Lint screen each load and periodic duct cleaning | Filter changes and inspection as needed |
| Installation materials | Dryer-exhaust-approved metal ducting | Materials approved for HVAC air distribution |
Cleaning the HVAC supply ducts does not automatically clean the dryer exhaust. A contractor may offer both services, but they should be identified separately in the quote. The dryer exhaust needs equipment and procedures appropriate for removing lint safely.
How Can You Tell if the Exhaust Vent Is Completely Clean?
A clean dryer exhaust should have no substantial lint blockage along the passage and should allow normal discharge outdoors. However, a visual check at one opening cannot confirm that every concealed section has been cleared. The full route may need inspection when drying problems persist.
After cleaning, check that the transition duct is connected securely and not crushed. The outdoor termination should allow the damper to open during dryer operation. The appliance should also return to expected drying performance for ordinary loads.
For a complicated installation, professional airflow testing or internal inspection may help identify remaining restrictions. A technician can evaluate whether the vent's length and configuration meet the dryer's requirements. A clean but excessively long or poorly routed duct can still perform badly.
If the appliance continues overheating or producing unusual odors, stop using it until the problem is assessed. Normal exhaust airflow does not rule out every internal dryer malfunction.
How Often Should You Clean a Dryer Exhaust Vent?
The U.S. Fire Administration recommends cleaning dryer vent ductwork annually and removing lint from the filter every time the dryer is used. The exhaust may require more frequent maintenance when laundry use is heavy or the vent route is unusually long. Symptoms of restricted airflow should prompt inspection before the next scheduled cleaning.
| Maintenance Task | Suggested Frequency |
|---|---|
| Clean lint screen | Before or after every load |
| Check filter housing | Periodically and when lint is visible |
| Inspect accessible transition duct | During routine maintenance |
| Check outdoor termination | Periodically for blockage |
| Clean full exhaust duct | Approximately once per year |
| Inspect after abnormal drying or overheating | As soon as symptoms occur |
These intervals are starting points rather than guarantees that a vent will remain clear. Some systems accumulate lint more quickly because of their configuration. Drying performance and visible buildup should guide additional inspections.
How Much Does Dryer Exhaust Vent Cleaning Cost in 2026?
Professional dryer exhaust vent cleaning costs approximately $145 on average in the United States in 2026. Standard services commonly range from $80 to $185, while roof terminations generally cost more. A severely blocked or damaged system may require additional work outside ordinary cleaning.
| Service | Estimated 2026 U.S. Cost |
|---|---|
| Standard dryer exhaust cleaning | 80–185 |
| Average professional cleaning | Approximately $145 |
| Second-floor exhaust cleaning | 110–185 |
| Roof exhaust cleaning | 150–250 |
| Standalone inspection | 30–60 |
| Basic household cleaning kit | 15–50 |
These are broad planning estimates and may vary with local labor rates. The standard quote should explain which parts of the exhaust will be cleaned. Replacement of damaged ducting or pest-related removal may be charged separately.
A household cleaning kit is less expensive, but the value depends on whether the full duct can be reached safely. For concealed vertical vents or roof terminations, professional cleaning may provide more complete access.
What Mistakes Should You Avoid When Cleaning Dryer Exhaust Vents?
Improper cleaning can damage a vent or leave a new obstruction inside the passage. A common mistake is forcing a brush through an elbow without knowing the duct route. Another is reconnecting the transition duct in a way that crushes it behind the dryer.
Avoid these common mistakes:
- Cleaning while the dryer remains connected to electrical power.
- Moving a gas dryer in a way that strains the fuel line.
- Using ordinary compressed air to scatter lint into concealed spaces.
- Forcing brush rods through heavy obstructions.
- Leaving detached brush parts inside the duct.
- Using plastic hose as permanent dryer exhaust ducting.
- Installing a mesh screen across the outdoor outlet.
- Using fasteners that protrude into the exhaust passage and trap lint.
- Venting a conventional dryer into an attic or crawlspace.
- Restarting the dryer before all exhaust components are connected.
- Running the appliance despite burning smells or overheating.
- Assuming a clean lint screen means the exhaust duct is clear.
Dryer exhaust systems are designed to carry moisture and lint outside the building. Any repair or cleaning method should preserve that function. Improvised connections that create restrictions may leave the appliance less safe than before maintenance began.
When Should You Call a Professional Dryer Exhaust Cleaner?
Professional service is appropriate when lint buildup extends beyond safely accessible duct sections. Long vertical passages or roof terminations can require specialized equipment. A technician may also identify damaged metal ducts or unsuitable transition materials that cleaning alone cannot correct.
A major obstruction deserves particular attention because forcing tools through it can damage concealed duct joints. Pest nests and difficult bends may need different removal methods from ordinary loose lint. The goal is to remove the material without pushing it farther into the system.
Qualified assistance is also necessary when accessing the vent involves disturbing a gas supply connection. A dryer should not be operated with a damaged or improperly restored gas line. Appliance safety and exhaust performance must both be considered before normal use resumes.
How Can You Prevent Dryer Exhaust Vents From Clogging?
Preventing excessive lint buildup depends on maintaining unrestricted exhaust airflow and following routine appliance maintenance. Some fibers will always pass through the filter, so full vent cleaning remains necessary. Proper installation reduces the number of locations where lint can accumulate.
Keep the Lint Screen Clean
Remove accumulated fibers before or after each drying cycle. Inspect the screen for tears or residue that restricts airflow through its mesh. Replace damaged filters with parts designed for the appliance.
Protect the Transition Duct
Check that the duct behind the dryer has not become crushed or disconnected. Move the appliance carefully during cleaning or renovation work. A damaged connector should be replaced with an approved material rather than patched repeatedly.
Maintain the Exterior Termination
Confirm that the damper opens during normal operation and remains free from visible lint. Remove accessible debris when the appliance is off. Do not add a lint-trapping screen to the outlet.
Follow the Recommended Cleaning Interval
Plan a complete exhaust cleaning approximately once a year. Shorten the interval when drying performance declines or the vent accumulates lint unusually quickly. A record of previous cleaning dates makes recurring problems easier to identify.
Conclusion
Cleaning a dryer exhaust vent requires removing lint from the duct and checking the connection to the outdoor termination. A suitable brush and vacuum can handle some accessible systems, while long concealed vents may require professional equipment. The exhaust must be reconnected properly before the dryer is operated. Regular maintenance helps prevent restrictions and reduce fire hazards. This week, check the lint filter and exterior exhaust opening for signs of buildup.